Creating Custom OG Images for Gatsby Blog Posts with gatsby-plugin-satorare using JSX Syntax
(This is a promotional article by the developer of gatsby-plugin-satorare)
Introduction
Recently, a new Gatsby plugin called gatsby-plugin-satorare was released. This plugin uses vercel/satori internally, allowing you to create OG image templates using JSX syntax.
In this article, I will use this plugin to create custom OG images for each blog post.
Finished Product
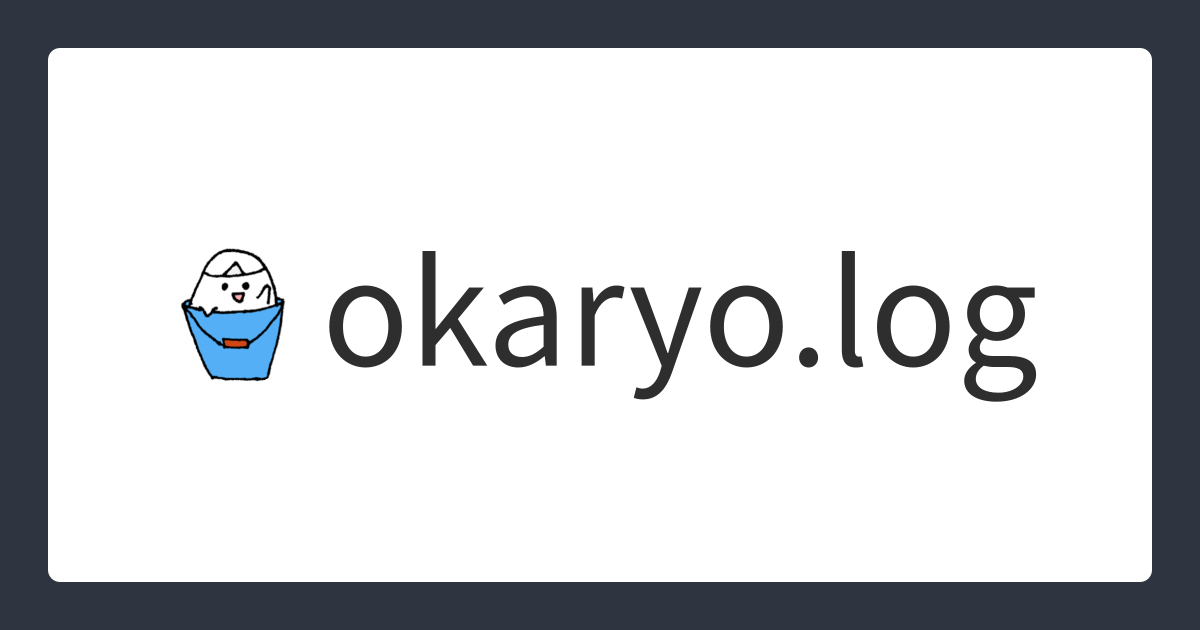
Let’s start by showing the OG images I created.
This is OG image for blog posts.
In addition to the blog post OG image, I also created a site-wide OG image.
How to Use
Install the Package
First, let’s install the package. The latest version at the time of writing is 0.1.1.
npm i -D gatsby-plugin-satorareConfigure the Package
Add the package configuration to gatsby-config.js. The only required setting is path, where you specify the path to the JSX/TSX file that will serve as the basis for the OG images.
Other settings, such as image size and font, can also be configured. For more details, please refer to the README.
{
  resolve: `gatsby-plugin-satorare`,
  options: {
    path: `${__dirname}/src/components/OgImage.tsx`,
  }
}
Create an Image Template with JSX Syntax
Now, create an OG image template using JSX syntax in the file specified by the path option. In this file, you need to default export a function that returns a ReactElement.
This function takes a Node as an argument, and based on its internal.type, you can create the necessary OG images. By default, you can receive two types of nodes, MarkdownRemark and Site, which are used for blog post-specific and site-wide OG images, respectively.
Here’s the image template I created. I found it helpful to use Vercel’s Playground to create the template while previewing the generated image.
import { Node } from 'gatsby'

type Frontmatter = {
  title: string
  tags: string[]
}

export default function(node: Node) {
  if (node.internal.type === 'MarkdownRemark') {
    const frontmatter = node.frontmatter as Frontmatter
    const title = frontmatter.title
    const tags = frontmatter.tags

    return (
      <div
        style={{
          display: 'flex',
          padding: 48,
          height: '100%',
          backgroundColor: '#2e3440',
        }}
      >
        <div
          style={{
            height: '100%',
            width: '100%',
            display: 'flex',
            justifyContent: 'space-between',
            flexDirection: 'column',
            backgroundColor: 'white',
            color: '#000000d1',
            padding: 48,
            borderRadius: 12,
          }}
        >
          <div
            style={{
              display: 'flex',
              flexDirection: 'column',
            }}
          >
            <div style={{ fontSize: 64, maxWidth: 1000, fontWeight: 600 }}>{title}</div>
            <div style={{ display: 'flex', flexWrap: 'wrap', alignItems: 'center', marginTop: 16, gap: 16 }}>
              {tags.map((tag, i) => (
                <div
                  key={i}
                  style={{
                    fontSize: 32,
                    fontWeight: 400,
                    backgroundColor: 'rgb(229,231,235)',
                    padding: '8px 24px',
                    borderRadius: 200,
                  }}
                >
                  {tag}
                </div>
              ))}
            </div>
          </div>
          <div style={{ display: 'flex', justifyContent: 'space-between', marginTop: 16 }}>
            <div style={{ fontSize: 48, fontWeight: 400, display: 'flex', alignItems: 'center' }}>
              <img
                src="https://avatars.githubusercontent.com/u/44517313?v=4"
                width={72}
                height={72}
                style={{ borderRadius: '50%', marginRight: 16 }}
              />
              okaryo
            </div>

          </div>
        </div>
      </div>
    )
  } else {
    return (
      <div
        style={{
          display: 'flex',
          padding: 48,
          height: '100%',
          backgroundColor: '#2e3440',
        }}
      >
        <div
          style={{
            height: '100%',
            width: '100%',
            display: 'flex',
            justifyContent: 'center',
            alignItems: 'center',
            backgroundColor: 'white',
            color: '#000000d1',
            borderRadius: 12,
            fontSize: 144,
            fontWeight: 600,
          }}
        >
          <img
            src="https://avatars.githubusercontent.com/u/44517313?v=4"
            width={144}
            height={144}
            style={{ borderRadius: '50%', marginRight: 16 }}
          />
          okaryo.log
        </div>
      </div>
    )
  }
}
Retrieve OG Images from GraphQL
Now, after building and checking the development GraphQL page, you should see the following fields added:
allMarkdownRemarkOgImageallSiteOgImagemarkdownRemarkOgImagesiteOgImage
I will use these fields to retrieve the OG images. However, before that, I need to prepare. To associate the blog post and its corresponding markdownRemarkOgImage, I need the NodeID of the post. To get the post ID in the GraphQL query, add the post’s NodeID to the context in the createPage function that creates the blog post pages.
// gatsby-node.js
createPage({
  path: post.node.fields.slug,
  component: blogPost,
  context: {
    id: post.node.id, // これを追加
    slug: post.node.fields.slug,
    previous,
    next,
  },
})
By doing this, the post ID can be obtained as ($id: String!) in the query. You can then associate this with the parent Node ID of markdownRemarkOgImage to obtain the path for the post-specific OG image. The site-wide OG image can also be retrieved using a similar query.
// query
`
query BlogPostQuery($id: String!) {
  markdownRemarkOgImage(parent: {id: {eq: $id}}) {
    attributes {
      publicURL
    }
  }
  siteOgImage {
    attributes {
      publicURL
    }
  }
}
`

// result
{
  "data": {
    "markdownRemarkOgImage": {
      "attributes": {
        "publicURL": "/static/8d5a6b2a951985acb20f041bf8f52e61/8d5a6b2a951985acb20f041bf8f52e61.png"
      }
    },
    "siteOgImage": {
      "attributes": {
        "publicURL": "/static/1d3db0d32c1e9ff61a30f15b2b9b6a2d/1d3db0d32c1e9ff61a30f15b2b9b6a2d.png"
      }
    }
  }
}
Set the image for og:image
Finally, set the meta tag for the OG image path obtained above.
const yourSite = 'https://example.com'
const ogImagePath = data.markdownRemarkOgImage.attributes.publicURL

return (
  <>
    {/* other meta tags */}
    <meta property='og:image' content={yourSite + ogImagePath} />
    {/* other meta tags */}
  <>
)
Conclusion
I was able to easily create individual OG images for each post, and the experience was great since I could write the templates using JSX syntax.
If you’re interested, please give it a try. If you like it, I’d appreciate it if you could star the project on GitHub.


